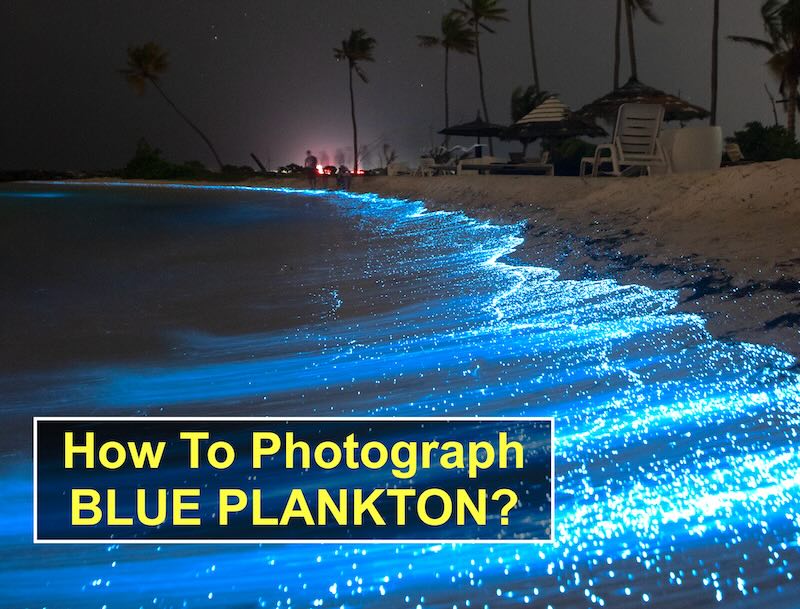
How To Capture Blue Plankton Photos on iPhone or Camera
One of the most popular and unforgettable experiences we offer is a night boat trip to the islands on moonless nights, where the ocean comes alive with glowing blue bioluminescent plankton.
This natural light show happens when the plankton is disturbed, creating a stunning blue shimmer in the water. It’s an incredible sight, but capturing it in a photo can be tricky. If you’ve ever tried and ended up with a blurry blue blob instead of that magical glow, don’t worry—you’re not alone!
Take BLUE PLANKTON Photos with your iPHONE.
Get a WATERPROOF CASE now.
For all your in-water Adventures in THAILAND!
As an Amazon Associate, I earn from qualifying purchases.
Taking clear, vibrant photos of bioluminescent plankton requires a bit of know-how, especially since you’re working in low light. But with the right settings and a little patience, you can definitely get some amazing shots.
Whether you’re using an iPhone or a DSLR, this guide will walk you through the best techniques to ensure you capture the beauty of the glowing plankton, rather than just a faint blue smudge in the dark. Let’s break it down so you can head out on your night adventure fully prepared to get that perfect shot!
Here’s a guide for both iPhones and DSLRs:
Tips for iPhone Photography of Blue Plankton
1. Turn Off Flash. The flash will overpower the faint bioluminescence and you won’t see it on the image.
2. Use a Tripod! This is the best tip we can give you. Use even a cheap tripod to hold your phone steady as you take images with long exposure to show the blue of the plankton.
3. Use a Timer. Use the timer function on your phone when it’s on a tripod so you can ensure less camera shake when you push the shutter button.
4. Increase Exposure. When taking an image, swipe up on the screen to raise the exposure slider. This allows the camera to let in more light. Try it at various levels and review your photos to see which setting worked best. Some experimentation is needed to nail it. You might need to max it out for optimal results.
5. Long Exposure. Use the iPhone’s “Live” function and hold the phone still for a few seconds to capture the light trails of the plankton. Later, as you review the photos on your phone in the Photos app, click the “Live” in the upper left-hand side and choose “Live Exposure” from the dropdown menu.
The Photos app will blend some images together to show any movement of the water and the plankton. This can show the blues better.
6. Night Mode. Newer iPhones have a dedicated Night Mode that can be helpful but experiment with it to see if it works better than the manual exposure adjustments above. It turns on automatically in dark situations.

Click the moon icon at the bottom of your phone to start it and choose how long the exposure is. You must hold your phone very still to capture a good photo. You cannot do it from a boat. A tripod with a plastic clip for your phone to hold it will increase the quality of your images dramatically.
Night Mode is available on the following iPhone models and cameras: iPhone 15 Pro, iPhone 15 Pro Max, iPhone 14 Pro, iPhone 14 Pro Max, iPhone 13 Pro, and iPhone 13 Pro Max: Ultra Wide (0.5x) camera, Wide (1x) camera, Telephoto (3x) camera, and front camera. iPhone 15 models, iPhone 14 models, iPhone 13 models, and iPhone 12 models: Ultra Wide (0.5x) camera, Wide (1x) camera, and front camera. iPhone 11 models: Wide (1x) camera.
7. IPhone apps like Photon Camera and Lightroom. Both of these apps (and there are dozens more) will give you full manual control over ISO, Shutter speed, and F/Stop so you can get the most out of your camera. You can also shoot in RAW mode which means you’ll get better quality and fewer JPG artifacts.
Editing iPhone Photos to Bring Out the Blue Light
In the Photos app, you can edit your photos to brighten them and increase the saturation level of the blue plankton.

Here’s How:
Open a photo in the Photos app. Choose Edit in the upper right side. Scroll through the circular options – each corresponding to a filter you can use to edit your image. Pay attention to these: Exposure, Shadows, Contrast, Brightness, and Vibrance.
Shooting Blue Plankton Bioluminescence with a DSLR Camera
Shooting the blue plankton with a DSLR or other larger camera will give you much better images and videos than using your iPhone, Samsung, or other phone camera.
1. Choose Manual Mode. Take full control over your camera settings for the best results.
2. Aperture. Use a wide aperture like f/2.8 or f/4 to let in as much light as possible.
3. ISO. Start at ISO 1600 and adjust higher if needed, but be aware of noise at higher ISOs.
4. Shutter Speed. Experiment with shutter speeds between 10-30 seconds to capture the movement of the plankton without making the stars blurry (if you’re also capturing the night sky).
5. Manual Focus. Since autofocus might struggle in the dark, switch to manual focus and use the live view to focus on the glowing plankton.
6. Tripod. Just like when shooting plankton at night with your mobile phone, using a tripod can substantially improve your bioluminescence photography. A sturdy tripod is essential for long exposures and to prevent camera shake.
7. Remote Shutter Release. A remote shutter release minimizes camera shake even further for long exposures.
More Tips to Help You Record Great Images of Blue Plankton
- Find the right location – Look for calm waters with high plankton concentration for the brightest glow.
- Compose your shot – Include interesting foreground elements like rocks, waves, or boats to add depth and context.
- Post-processing – Use noise reduction software to clean up any grain in your photos.
Here are some examples of successful camera settings for capturing bioluminescent plankton:
- iPhone – ISO 3200, f/1.8, 10-second exposure
- DSLR – ISO 3200, f/2.8, 15-second exposure
Use these as a starting point, and then start adjusting all of the other settings that will help as outlined above.
Don’t forget video! Sometimes video can show up even better because the sharpness of the image is not that important because there are 30 of them taken per second at the 30 fps rate.
Whatever you do, remember to bring a TRIPOD!
Best of luck! Remember, the best settings will vary depending on your specific camera, the conditions, and the intensity of the bioluminescence. Don’t be afraid to experiment and have fun capturing this mesmerizing natural phenomenon!
Take BLUE PLANKTON Photos with your iPHONE.
Get a WATERPROOF CASE now.
For all your in-water Adventures in THAILAND!
As an Amazon Associate, I earn from qualifying purchases.
Info About Blue Plankton in Thailand >
One of the Great Places to See It in Krabi >